Sunday, March 20, 2011

Staying Current

For those of you that are Instrument rated, you are aware of the regulations to stay legally current in order to keep flying in IMC (Instrument Metrological Conditions). According to FAA Regulation 14 CFR Part 61, to be current, you must have performed and logged, within the previous six months, instrument experience in the following areas: at least six (6) Instrument approaches, conducted holding procedures, and have intercepted and tracked courses using navigation systems. Some pilots do this by knocking out all the requirements in one flight and others break it down over the six month period. If you fly frequently, then it just kind of happens, and you remain current. Keep in mind though there is a difference between currency and proficiency and just because you are current, doesn't mean that you are proficient!

This leads me to my flight yesterday. I fly a fair bit with 210 hours last year and I averaged 19 hours a month, which is pretty good. I flew a lot of major cross country trips from Kansas City to Minnesota, Wisconsin, New York, Georgia, Tennessee, Kentucky, Alabama, and Texas. On almost every long trip I took, I logged some IMC time and had to shoot many instrument approaches. However since last November I haven't been flying nearly as much due to the bad weather we were having here in the midwest (lots of ice and very cold), as well as an electrical issue that had my plane AOG for a while and then I had to conduct my annual Inspection, which also took a few weeks. That all being said, my instrument currency was getting close to "expiring" and well my proficiency kind of sucked!

Yesterday my buddy Frank met me at the airport to get up and get my currency up to date and to work on my proficiency. We departed KMKC around 0800 to get some approaches done on a nice fairly warm sunny day. It was a little windy with winds around 11-15 knots on the ground out of the east and much higher at altitude. Our first stop was to shoot the ILS RW33 at Lawrence (KLWC). This approach came up on us fast being that we had a tail wind of 42 knots at 2500'. We departed from KMKC under VFR (Visual Flight Rules), yet we were well inside the Class B airspace, so we had to be a bit careful and not break any airspace on our way to Lawrence. My set-up for this approach was a bit behind and I flew through NEWBN the initial approach fix a little and headed out bound for the procedure turn. Another issue that put me a little further behind the airplane was that the S-TEC55 autopilot that I was flying at the time, wouldn't load the approach and gave me a "FAIL GPSS" indication, so I had to continue to fly by hand. We believe this to be because of the more than 30 degree angle it was sensing when I activated the approach. My typical methodology is to fly on autopilot until I'm inbound on the approach and turn it off before the FAF (Final Approach Fix) and then hand fly the approach to the ground. With the autopilot failing, I hand flew the entire approach. Because of the winds being so high and out of the East, this made for a challenging yet fun ILS! The approach went ok, but I could tell that I was a bit rusty. We went "missed" at the MDA (minimum descent altitude) and then headed for Topeka Billard Municipal Airport (KTOP) via the Topeka VOR. KTOP does not have approach radar, so we contacted the tower and they told us to report inbound from BILOY for the ILS RW13. We pretended we were getting vectors to final and then reported BILOY inbound for a coupled ILS approach. This time I set up early and had the autopilot fly the entire approach. It was really windy, but it executed the approach well enough with a little help from me to keep it from over correcting and we landed with no issues. At this point it was off to the airport cafe for some fantastic breakfast! :-)

After breakfast we decided to fly to the Topeka VOR (TOP) and execute some holds and then execute the VOR RW22 approach back into KTOP. The winds were 130@12 and RW13 was the preferred RW, but I asked for RW4 since it would take us directly to the VOR and I could also practice a cross wind take-off. We departed with no issues and I set up for the VOR hold at TOP. This is where the fun began (remember I said the winds were 42 knots at 2500') as I attempted to cross the VOR at 2800' to set up for a tear drop entry. The winds were so strong that I got blown to the west of the VOR and had to compensate more east to get into the hold. Because of this massive deviation, we decided to make a right turn (east) and basically do a direct entry and then head straight in for the VOR because we were so badly off course. We then crossed the VOR and made the easterly turn and entered the hold. We made two race tracks around the hold using massive corrections to compensate for the winds and then shot the VOR RW22 approach with a circle to land RW4. My next issue happened that lack of proficiency caused, where my Navigation radio (G430 GPS) decided to stay suspended in the hold, while I began to execute the decent. So fighting with the wind, I had to reset the approach in the radio while executing the approach. This was a real pain in the butt, but I had the VOR tuned in and could fly the necessary heading, but if it would have been IMC, I most likely would have gone missed and then re-executed the approach. I descended to minimums and then began a close left downwind RW22 over the field and then brought the plane around for a low approach over RW4. This was a really fun approach because of all the complexity of changing headings at the VOR upon exit of the hold and then adding the close circle to land and low approach.

Next we departed the pattern, climbing to 5500' and direct to East Kansas City (3GV). I called up Kansas City Approach and they cleared me through the Class B and gave me vectors to the GPS RW9. After being cleared I executed the GPS RW9 non-precision approach and landed with no issues to get some fuel. This was my first time into 3GV on a full stop landing and I was a bit shocked at how poor the runways were with all the bumps and humps. This place has prop strike written all over it! We fueled up and decided to execute a soft field take-off, so as to help reduce any prop strike incidents and departed back to KMKC. While we had been flying we were watching a small storm cell moving towards Kansas City and it now appeared to be just to the south west of the city and moving in fast. Shortly after landing at KMKC it began to rain and then actually snowed!! It was a good thing that we finished when we did or the weather could have been really ugly.

So after executing four approaches, holds and tracking navigational aids and I am current for another "six months", since I had executed two approaches in December. Needless to say, I am NOT proficient and need to get back up and do some more practice. I am feeling a bit rusty - still safe, but rusty. With the summer weather approaching, hopefully I will get some more flying time in soon. It was a great day to fly and the winds made it challenging, but once again this is why I love flying so much, because you have to stay proficient and fly often to retain the skills that you have learned. Staying proficient is EXTREMELY important to me, since I often fly with my family on board and I owe it to them to keep them safe at all times.

Sunday, March 13, 2011

Electrical Issue Fixed

While 9WC was getting its annual done, we took off the main alternator and shipped it off to Aircraft Systems and had them conduct an IRAN (Inspect and Repair As Necessary).    As it turns out I had a bad rectifier that had some connections that came unsodered.  Aircraft Systems also did some upgrades to it and sent it back.  TJ at Aircraft Systems said that they see a lot of alternators off of Cirrus that have this issue.  It is the same alternator that is also used on Beechcraft as well, but they don't see as many as they do the Cirrus.  He believes that the damage is caused by two things on a Cirrus.  The first issue is that most Cirrus come with a very light weight propeller that cause more vibrations around the engine area and the second issue is that the cowling on a Cirrus are pretty tight to aid in aerodynamics.  This tightness doesn't allow the alternator to get enough air over it, so when a plane is on the ground, the alternator can overheat.  Once the plane is airborne it isn't an issue, so TJ recommends that people not put a huge load on the systems while on the ground under idle.  Since the annual is done I took the plane up for a test flight and all is back to normal.  No more annunciator lights or low volt warnings.  I'm glad that fixed the problem, because the next steps in trying to solve the issue would have gotten fairly expensive.

Friday, March 4, 2011

Cirrus Airframe Parachute System (CAPS)


The Cirrus Airframe Parachute System also known as CAPS provides the Cirrus aircraft with an additional level of safety. It is not guaranteed to save the occupants in the event of an accident, but it definitely provides another option, where as no other aircraft on the market can.

As of January 30, 2001, there have been 29 known CAPS activations. Of those activations, 26 deployments are considered to have been "saves" that involved 50 survivors with one fatality. This figure also does not include the one unborn child who was also saved in CAPS pull #13. There were four other activations however that were not successful deployments, resulting in five fatalities and two serious injuries. The four unsuccessful deployments involved one activation at very high speed (likely in excess of 270 knots, twice the deployment speed), one activation at too low an altitude to fully inflate the canopy (witnesses report 50 to 200 feet above ground), another activation where the rocket took an unusual trajectory resulting in a failure to extract the parachute, and a mid-air collision where the parachute was likely activated by impact forces. The rocket trajectory anomaly was investigated and an airworthiness directive was published requiring a modification of the CAPS rocket assembly. Although any loss of life is tragic, 50 "saves" is pretty amazing and thanks to this new safety measure, that is 50 less fatalities in General Aviation.

For more information on each individual accident, please go to http://www.cirruspilots.org/Content/CAPSHistory.aspx

Pictures of the internals

Here are a few of the pictures of the internal workings of the SR22.

The parachute, also know as the Cirrus Airframe Parachute System (CAPS™).


This is an inside look at the tail. It's cool to see how the carbon fiber/composite is formed.


This is the mechanical portion of the rudder and elevator assembly in the back of the aircraft.


Inside of the wing assembly.


The nose gear assembly. The big black bumper is the shock dampner for the nose gear assembly.

My First Owner Assisted Annual


After much research I decided that I would do an owner assisted annual on my 2004 SR22. I am a very meticulous person and pretty mechanical, so working on the plane really hasn't been all that big a deal. As it is, I do all the maintenance that I can legally get away with according to the FARs. I have a very competent mechanic (Glen) and he is pretty good about teaching me the aspects I need to do my part and by doing it myself it would save me a TON of money. In my area (Kansas City) there are only a couple Cirrus Certified Service Centers and all of them charge a flat rate of around $2400, just to inspect the aircraft. This does not include working on anything they find, but only on taking the plane apart, inspecting it, checking for ADs and SBs and put it back together. This is VERY pricey and quite frankly a rip off, because disassembly of the aircraft is really quite simple.

For my inspection, my mechanic and I looked over the Cirrus Maintenance Manual (CMM) and used the check list to determine what tasks were mine and what were his. We started out by conducting a before maintenance check of the aircraft where we started it up and ran the engine to test different aspects from fuel flow, to sensor readings to brake performance. One of the test was to go full throttle on the ground, which took both of us to stand on the breaks to ensure that we didn't move. With 310HP, it was damn near impossible to keep it from moving. The brakes held, but barely!

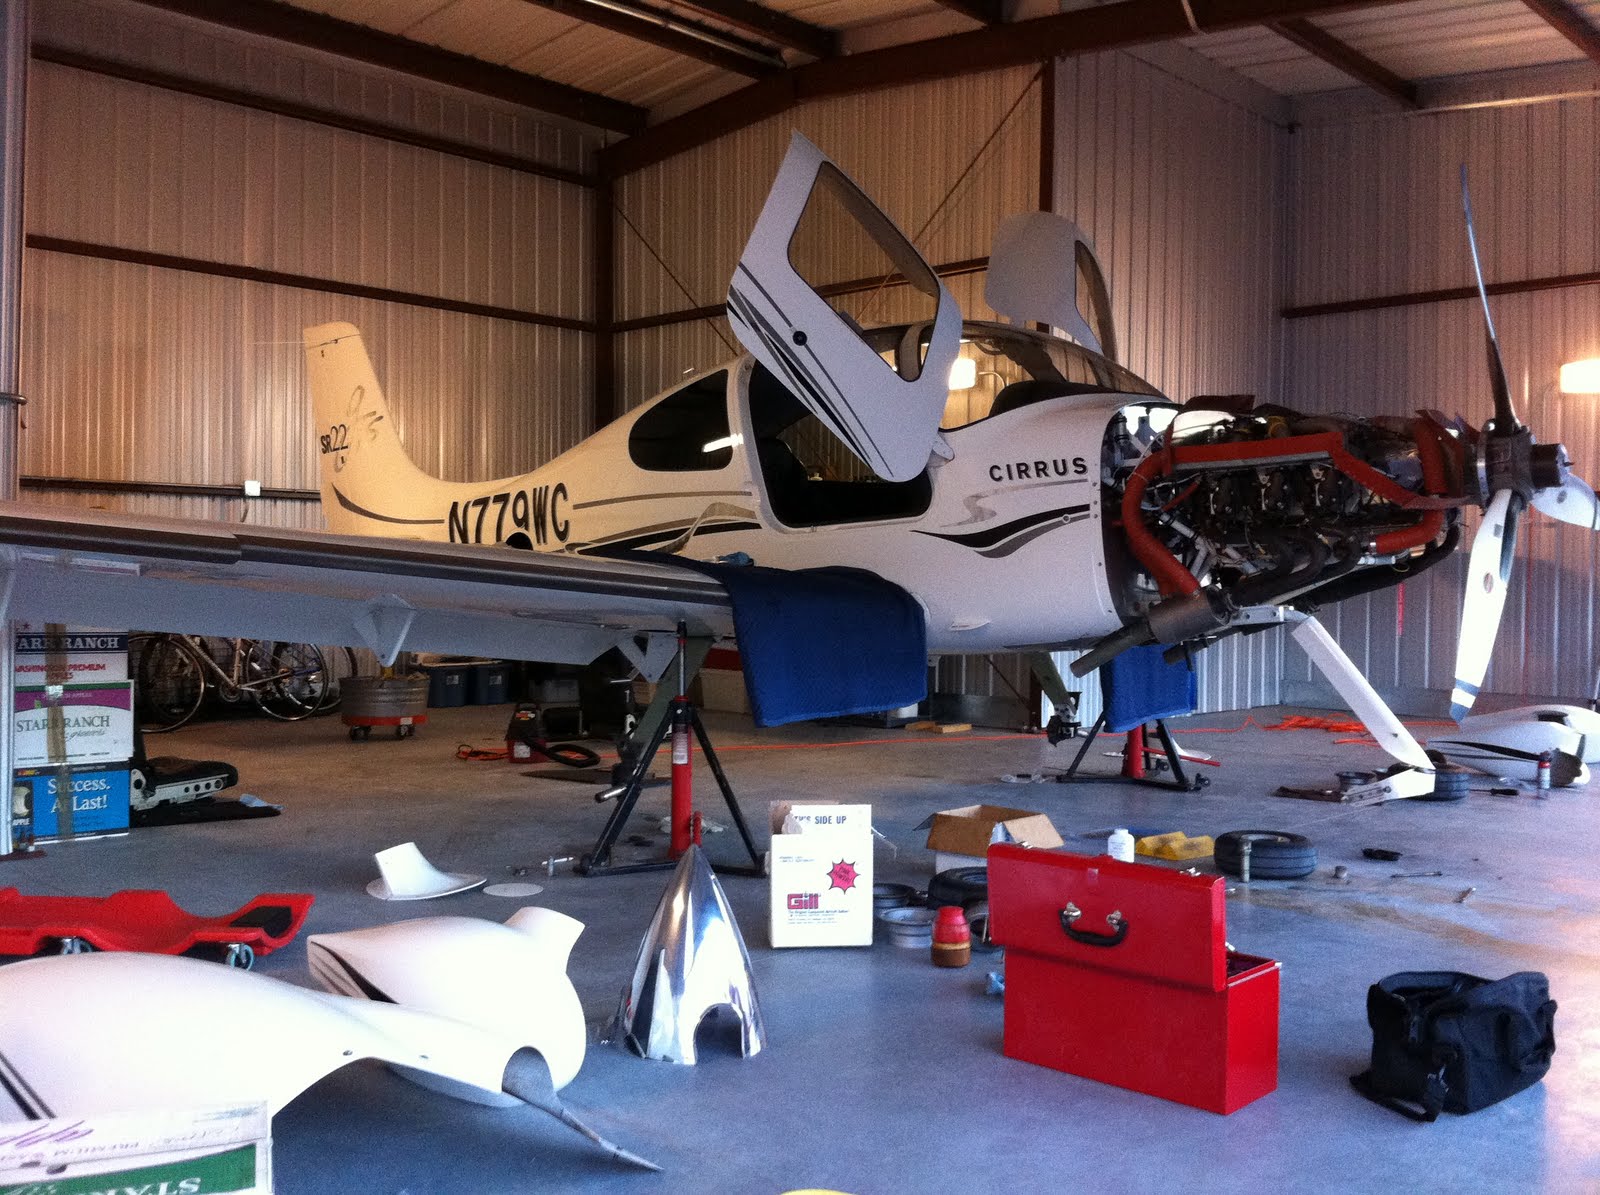
After Glen was happy, we then put it back in the hanger and I began to take apart my items. My focus was to take off the entire cowling, wheel pants, inspection covers all around the aircraft, and to completely remove all the seats, carpet, and inside inspection panels. I also changed the oil, removed the battery starter (I was having some issue with it, so Skytec told me to send it back since it was under warranty, and alternator #1. My alternator had been giving me some issues, so I had to get that off to send in and get repaired. All of this took me approximately 15 hours, although I think I could do it much faster the second time and also if I wasn't jaw jacking so much with everyone that stopped by.

Once it was all taken apart, Glen pulled out a flashlight and started checking everything out. After his inspection was complete, he then went around and greased everything that needed to be greased, put in some new sparkplugs, repacked my wheel bearings, flipped my main tires and put in new tubes (old ones had some creases that would become leaks). Glenn also did a compression test and we got #1-77/80, #2 77/80, #3 76/80, #4 70/80, #5 77/80, #6 77/80. Being that all my compressions are in the high 70s, my engine is doing good. My #5 exhaust valve seemed to be leaking a little, hence the 70/80, but when we reviewed the engine log books, we found that it had been 70/80 since the day it came from the factory and I haven't had any issues after 873.1 hours, so my mechanic said not to mess with it and keep running it. On another positive engine note, Glen told me that he was absolutely amazed at the condition of my engine. He said that he had never seen an engine before that was consistently leaned out and run at LoP (Lean of Peak). My engine had zero, zilch, none, nadda carbon or lead build up at all! In fact the insides were so clean, that you could literally read the serial numbers off of the pistols! He said that most the of the engines he works on are flight school engines, but he had never seen any engine this clean. It just goes to show you that if you run your engine properly and use the LoP methods, it will greatly reduce the wear on the engine. From much of my research, most Continental IO-550Ns like mine have very low compressions (50-60s) at this point and as they approach 1200 hours they are needing new cylinders. My appear to be running as strong (actually stronger) than when they were brand new. Hopefully this trend will continue!

The process of doing this annual has taken a pretty good chunk of time over numerous days. There have been delays since my mechanic has been sick and because I have had to wait on my alternator and starter to return. The only real squawk that we found was I had were two "T" fittings on the TKS system that appeared to be leaking. These we will have to disassembled and replace the o-rings and reassemble to fix. We are putting this off until we get the alternator back and reinstalled to verify exactly where the leak is coming from before we get too carried away. If we were to buy the parts from Cirrus, they would $57.16 for each "T" fitting, when all we will probably have to do is take them apart and fix the o-rings.

Other than fixing these fittings, the only other thing I had to do was replace two tubes in the main wheels, replace the spark plugs since the original Fine Wire Champion spark plugs had almost 900 hrs on them which is high and they can be prone to cracking and breaking, so I thought I had pushed them long enough. I also had to replace eight D-cell batteries in the ELT and Glen fixed a leaking valve gasket, but that was it. Now weather permitting (we just had a cold spell and more snow) and parts returning, we can start to put it all back together!